These paper craft ideas can save you lots of money if you’re deciding to spend Christmas on a budget. That is if your ready to use whatever you make with your hands. They can be a fun filled sport for your kids and the whole family to make together. You can either use this as an ornament or place it someone where on the table.
Here are some DIY ideas for the whole family
Christmas tree

This tutorial below is by One little project at a time
Materials and Equipments
- Printer paper (OR ORIGAMI PAPER, OR WRAPPING PAPER)
- Scissors
Process:
- Step 1: Find what you need. Simply grab a piece of regular printer paper and a pair of scissors!
- Step 2: Create a square piece of paper: Take the top left corner of the paper and bring it down to meet the bottom edge. Make sure the two edges are lined up then run your fingers along the diagonal edge to make a fold.
- Cut off the rectangular strip along the edge of the paper that was folded over.
- Step 3: Make the tree folds: When you unfold the triangle you should be left with a perfect square.Bring the bottom left corner of the paper up to meet the right corner. Make a fold then open the paper again. You should have an X shape in your folds. Flip the paper upside down. Bring the top edge down to the bottom edge and make a fold. Open it up then bring the left edge to meet the right edge and make a fold.
- Open the paper and place it in front of you like a diamond.
- Bring the left and right corners to meet in the middle.
- Then bring the top and bottom points to the middle so your paper is flat.
- Place the paper in front of you like a diamond. Turn the paper so the folded edges are at the top.
- Step 4: Make the inner folds: Bring the top layer of the right corner to the middle and make a fold. Repeat for the top layer of the left corner.
- Unfold the left side and open the paper by sticking your finger inside. Push the middle fold towards the center turning it inside out then press the edges to crease them. Then fold the right flap over to meet the left.
- Repeat the previous step on the right side.
- Step 5: Repeat step 4 on other side: Flip the paper over.
- Repeat Step 4 on this side, first folding both corners in to the middle of the paper.
- Continue repeating the last step — Unfold both sides, place your finger inside and push the middle fold towards the center to turn the folds inside out. Run your fingers along the folds to make sure they’re crisp.
- Step 6: Make cuts in the paper. Cut off the bottom section of the paper, leaving you with a triangle tree shape.
- Cut four parallel lines along the outside of the triangle. Make sure not to cut all the way to the center and space the lines fairly evenly.
- Make the same cuts on the opposite side of the triangle.
- Step 7: Fold the cut edges in. At each of the cuts, take the top layer and fold it down to make a triangle shape.All of the folds should go in the same direction, so only fold one edge of the tree at a time.
- Flip the top layer over like a page in a book. Then continue folding the next layer down at all of the cuts to make more triangle shapes.
- Continue these folds until you have to flip over the tree. Then continue on the other side until all of the layers have been folded.
- Stand your tree up and adjust the layers so they’re spread out evenly and your tree stands on its own.
Christmas cards
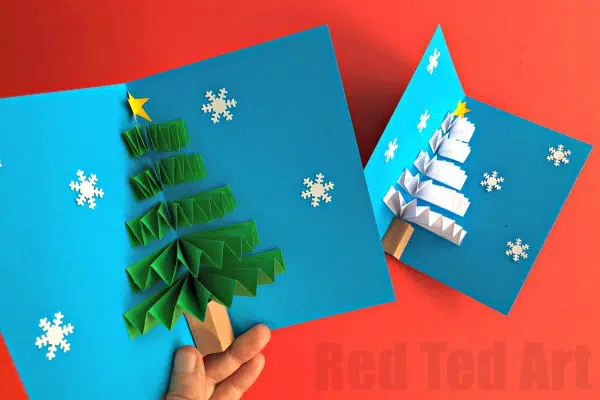
This tutorial is by Red Ted Art
Materials and Equipments:
- A5 sheet of green paper (or white) – this can be construction paper, but I usually use “printer paper” quality paper for these crafts
- A little brown paper/ card
- Scrap of yellow paper for the star
- Snowflake confetti (optional) – I have used ours on a number of projects and it lasts ages
- Glue stick
- Scissors
- Ruler
- A6 card stock and envelope
Process:
- We used an A5 sheet of green paper – which is approximately 10cm x 15cm. I am aware that US “standard sizes are a bit different… it doesn’t have to be exact! Just adjust the sizes in the next step.
- Fold your paper along the 15cm edge as neatly and evenly into a paper fan as possible. You should be left with a concertina paper strip 15cm long. We made 0.5mm wide accordion folds.
- Cut this paper strip into 5cm, 4cm, 3cm, 2cm and 1cm (A5 is actually JUST a little smaller than 15cm, so just adjust each section by a couple of mm and you are fine!). As mentioned.. it isn’t exact. Just make sure you get 5 pieces that get smaller each time.
- Take your brown piece of paper. You will need approximately 3cm x 3cm. Fold it in half. Then fold the edges in by 0.5mm. So you should have folds: 0.5mm, 1cm, 1cm, 0.5mm. Glue the 0.5mm strips onto the card. You now have a “Pop up” steam.
- Take your longest strip and glue just above the tree trunk on the LEFT side of the card.
- Repeat this step and layer the remaining 4 strips evenly – leaving a little space for a star.
- Once all are glued in place. Carefully add glue to the “upward facing” surface of your strip. This can be a bit fiddly.. as the concertinas like to bounce around a bit.
- Hold in black. Flap over the right side of the card and secure to the the green strips.
- When you open the card up, you should have your paper fan Christmas Tree pop up
- Now have fun – add a Christmas star.. snowflakes, night sky stars, a Christmas present, a snowman… anything you wish!! Enjoy.
Cardboard Ornament
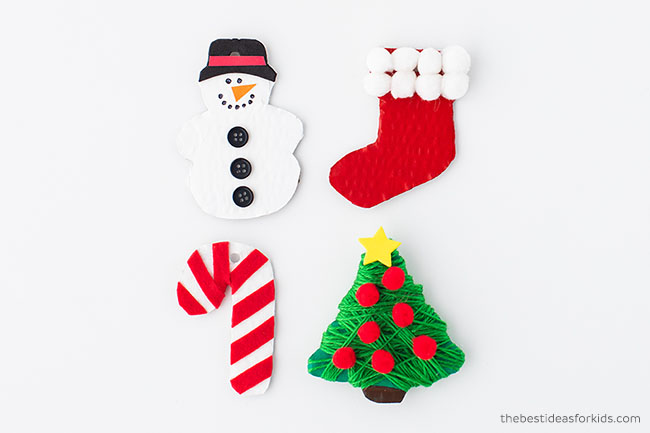
This tutorial is by The best ideas for kid
Materials and Equipment:
- Cookie Cutter (snowman, candy cane, stockings, tree)
- Cardboard
- Red, White, Greem Paint
- Small White Pom Poms
- Twine
- Glue
- Red felt
- Green yarn
- Black Buttons
- Orange Cardstock
- Black Sharpie
- Black Foam or Paper
- Red Foam or Paper
- Small Red Pom Poms
- Yellow Foam Star
Process:
- Trace your favorite Christmas cookie cutters on the cardboard.
- Cut out the different shapes.
- Punch a hole at the top of the cardboard shapes. Then paint the snowman and candy cane white. Paint the stocking red and the Christmas tree green.
- To make the candy cane, cut out strips of red felt and glue them diagonally to the cardboard.
- To make the Christmas tree, wrap green yarn around the cardboard. Decorate with red pom-poms and a yellow foam star sticker. Tie the yarn to the back of the ornament or use glue to affix the end down.
- To make the stocking, glue white pom-poms to the top of the stocking. You can also use cotton balls.
- To make the snowman, glue on the 3 black buttons. Glue a piece of black foam or cardstock to the top to make the hat, and then trim around the edge to fit it to the snowman’s head. Add a red cardstock strip for the brim of the hat. Add a nose by cutting one out from orange cardstock.
- Draw the eyes and mouth with the black marker.
- Add twine to the ornaments for hanging.
Toilet roll Reindeer
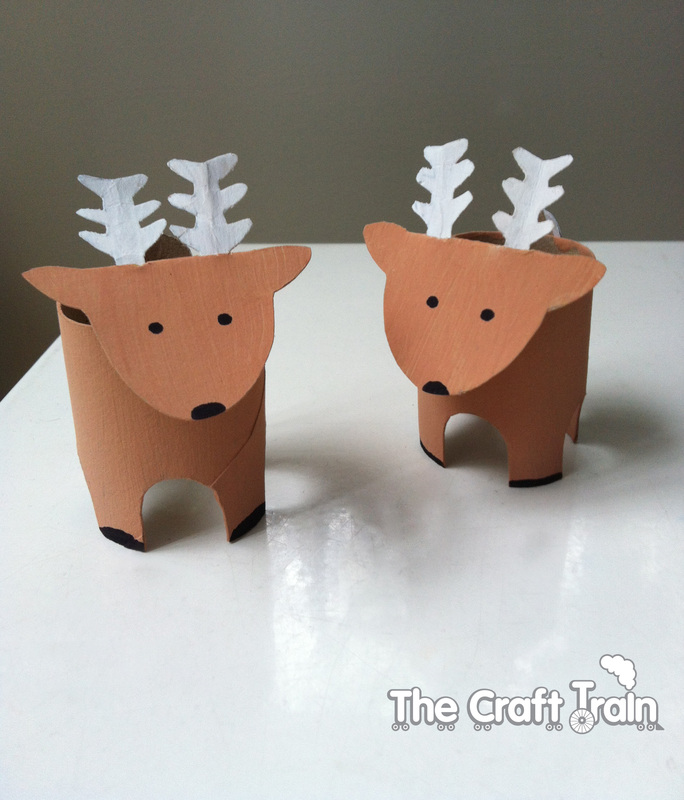
This tutorial is from The Craft Train
Materials and Equipment:
- Toilet roll
- Scissors
- Cardboard or Heavy Paper
- Pencil
- White Paint
- Glue
- Marker
Process:
- Make 4 dots around the bottom of a toilet roll, marking the 4 opposite sides. Cut a small arch around each of the dots. Once you have cut the first arch, use the small piece removed to trace the exact shape over the remaining 3 dots, this way they are all the same and the legs are an even size. Reserve one arch for the tail piece.
- Cut approx the top third away from the toilet roll (on the opposite side to the legs) leaving a small neck to attach the head.
- From a piece of cardboard or heavy paper, draw an oval shape for the head, with an ear sticking out each side about one third of the way down. Cut around the shape and fold back along the top of the ears.
- Draw 2 little antler shapes with a longer than necessary stem for ease of attachment. Cut them out. Tip: To make them even fold the paper in half first, then draw half an antler along the fold, cut it out & unfold to make the full antler.
- Paint the toilet roll and head shape brown, and the antlers and one of the arches made from cutting out the legs white.
- Once dry, cut 2 small slits along the fold of the head to slot in the antlers. Slot them in and attach with double sided tape. The attach the head to the neck from the underside with double sided tape.
- Attach the little white arch to the rear end for a tail.
- Draw a face & hooves with a black permanent marker.

